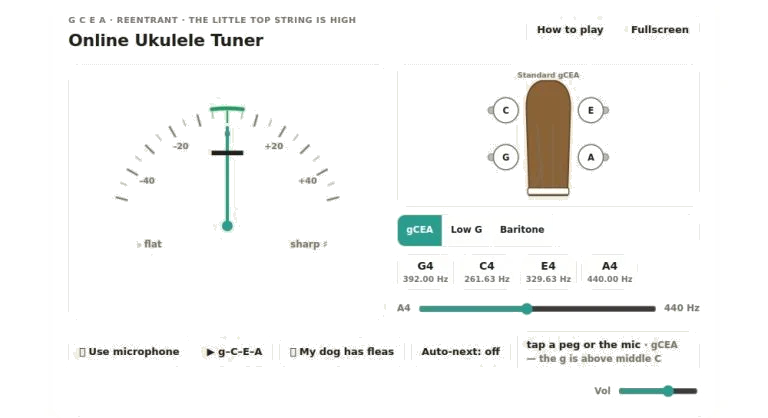
Use this online ukulele tuner to get your uke sounding right. Before you play, or even after that marathon jam session, just use your computer’s mic and have at it.
There are two primary options for how to use the tuner. 1) Play a string on your own ukulele and the software will pick it up through your computer’s mic. Or 2) Use the embedded reference tones which will play you what each note should sound like. Both is designed to be quick and easy, providing immediate results on whether you’re in tune or not.
How to Use the Ukulele Tuner
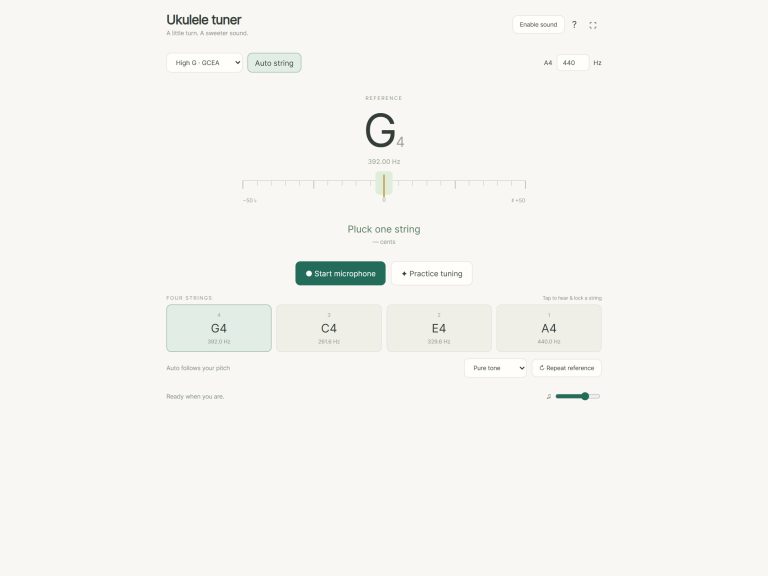
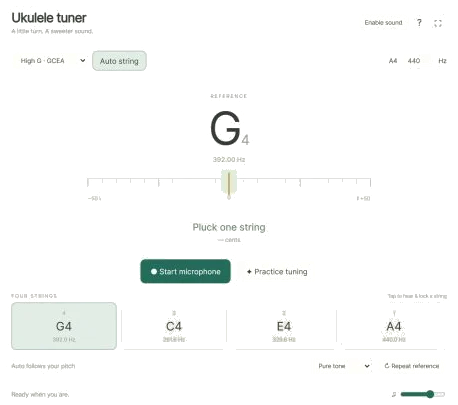
To begin, choose how you want to tune using the segment buttons located around the middle. Standard gCEA is the default option, this is what is considered “standard” tuning on a concert or soprano ukulele. Clicking on the Low G button will then change the top string from a high g to a lower G (so you’re getting a linear pitch range on all four string). You’ll notice the headstock pegs and string chips adjust to match, showing the right notes for your chosen tuning.
For baritone ukuleles, choose the Baritone DGBE option. This gives you the top four strings of a regular guitar, ideal if you’re swapping back and forth between instruments. After choosing your tuning, the headstock pegs and string labels will change to show the right notes for your choice.
Click on the Use microphone button at the bottom if you’d like to use your microphone instead. Allow browser permission to access your computer’s audio input. Next, pluck one string on your ukulele. The tuner listens and tries to lock onto the closest matching string based off your selected tuning. It displays this as a large gauge in the middle with a needle that moves right for sharp notes or left for flat ones. Try to get the needle into the green zone in the center. A nice little chime sounds when you’re close enough to the target pitch (within five cents). The associated string chip turns green, confirming you’re in tune. Toggle the microphone off once you’re finished to stop listening.
If you want to go by ear, just use the reference tones. You can click the tuning pegs on the illustrated headstock, or tap on the string chips on the right. As each string is tapped it will play a pure tone of the target frequency for that string. It displays the note name and frequency in the read out area so you know exactly what you’re hearing. Click the sweep button to listen to all four strings together from low (g) to high (A). This allows you to quickly check that the overall pitch sounds more about right before you begin fine tuning each of the strings individually.
There’s even a fun button labelled My dog has fleas. When you click this button it will sound out the four open strings in time with the famous song. If you can hear the words in the notes, you’ve got them dialed in.
It’s customizable based off where you play If you prefer something more subtle and/or are playing in a quiet space, then lower that volume on the slider on the bottom right. You will hear the reference tones at whatever level you desire. The other slider here (calibration) allows you to adjust the pitch of the references. The standard pitch is 440 Hz, but some orchestras or older instruments uses slightly different standards. By dragging this slider, you’ll change the base frequency for every note, allowing your tuner to work with what you need.
For those who is tuning via the microphone, there’s an option to enable Auto-next. Once you’ve held each string in-tune for several seconds, it will advance to the next string by itself. This is handy for breezing through the four strings without needing to click your way through them.
Even quicker is using keyboard shortcuts. Hit the keys 1 to 4 on your keyboard to hear reference tones for strings 1 to 4 (A, E, C, G respectively) in standard tuning. The M key will turn the mic on/off without touching your mouse. And the question mark key shows/hides the help panel with a quick listing of the above controls. For even more room on-screen, use the fullscreen button that expands the tuner to fill your display (with larger buttons and an easier-to-read gauge).
Inevitably, new strings stretch, which means you’ll have to retune multiple times in the first few days. To help them settle in, gently stretch each string away from the fretboard. You can do this while the tuner is in microphone mode and watch it work live. It’s immediate feedback. It might jump sharp or drop flat, but there’s no doubt about what you’re hearing.
If you’re just learning the chords or an old hand prepping for that gig, either way, it’ll deliver the accuracy you need. Calibrate it (and the volume) as you wish, and go play. When all those strings line up, your uke sounds at its best.