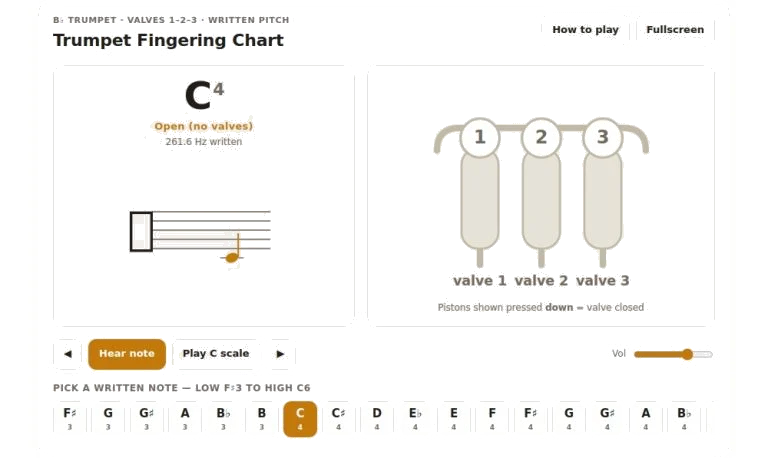
This is a really useful way to visualize and even hear trumpet fingering as you go. Simply click on the image below (or touch with your mouse or trackpad) to play around with the instrument. Alternatively, if you prefer to navigate more quickly around notes, then using your computer keyboard is an option too.
For a traditional B flat trumpet, this is what you’ll see displayed on screen with the corresponding valve combinations to produce each note: If we look to the center of the widget there is a valve diagram with three pistons marked as one, two and three. If these are highlighted and pressed down, it means those valves should be pressed when playing. A raised or open piston mean there is no pressure on that valve. Valve one is closest to mouthpiece. Valve two follows it, and valve three is furthest away near the end of the instrument.
How to Use the Trumpet Guide
By visually seeing this feedback, you will begin to learn muscle memory without having to have a real-life trumpet in your hand. Next, we’ll turn our attention to the big note display. There’s also a row of chromatic-scale buttons across the bottom of the main screen. These represent notes from low F below middle C up to high C. Clicking on a button takes you instantly to that note, updating the frequency read-out, the staff of musical notation, and the valve diagram corresponding to whichever note you have chosen.
The transport-bar buttons allows you to play through the scale step by step. This is useful if you are practicing smooth transitions between notes. You can also use them to see how the instrument would be fingered for a particular melody line. The main play button is located towards the centre of control bar. Simply press it and you will hear that note’s sound. Alternatively, you could simply click the valve diagram or even the larger note name to make it sound too.
You’ll notice a volume slider on the right side of the control bar. You can use it to adjust the level based off where you are listening. Want to hear something you are more familiar with? Then click the play scale button. It will cycle through a regular major scale beginning at middle C, giving you an instant point of reference for how the fingerings change as you rise and fall through the range.
There is different combinations of fingers that can be used for a single note on the trumpet which are sometimes called alternate combinations. An extra button will then appear in control bar when there is more than one option for the chosen note and you can click to switch between the two. This can be very useful for advanced players who need rapid access to other valve combinations for certain technical passages or for intonation changes. It also allows you to see the alternatives in clear view alongside each other in the chart.
The widget is also made easy to use with your computer keyboard. Keep your hands on the keyboard instead of using the mouse. Use the left and right arrow keys to move up and down through notes, then tap the space bar to hear the highlighted pitch again. If there’s an alternative fingering available for that particular note, you can use the ‘A’ key on your keyboard to turn it on/off. To give yourself more screen space to see the diagrams properly, tap the ‘F’ key to go into full-screen mode which removes other elements around the diagram. Tapping the question mark key will bring up a brief help overlay summarising the above keyboard shortcuts.
It is important to realise that the chart represents written pitch not sounding pitch. If you compare what a trumpet player sounds like with what’s been written down, then they will play a whole step below the note that has been written on the staff. The chart also provides an option of displaying frequency (the number of times a second a sound wave vibrates) represented in hertz, which could of used for tuning or ear training purposes.
While using the widget try playing your own instrument at the same time so it can be used as a point of reference against which to check fingerings and how valve combination affect pitch change. Experiment with playing some simple melody or scales using the arrow keys and note the pattern of valves as they change. Listen carefully for the sound each produces and pay attention to any variation in response and tone from the primary fingering different than the alternative. Move up and down the scale to get accustomed to the arrangement of notes on the instrument.
This is a great little aid that gives immediate visual and audio feedback. It helps whether you’re an old hand wanting to check something tricky or just starting out to learn the ropes. Simply choose your note, press play and go exploring.